Here are some tips for learner's when you're working with AutoCAD :
1. Must draw object within it's actual size / scale.
2. Ensure to draw object exactly / accurately.
3. Before plotting / printing, ensure / double check all of your drawing is ok.
4. Use layer own it's own. Different object with different layer. Don't use the "0 layer".
5. To get your AutoCAD + window running at optimum level, try to defragment your computer hardrive regularly (onece a week).
6. If you're still using a floopy disk for saving file, change or use other method such as pendrive because you may freeze or crash during loading or saving your file.
7. Select and use different color for representing different line object.
Sunday, July 3, 2011
Wednesday, May 25, 2011
How To Insert Charts From Excel
AutoCAD 2007
1. With AutoCAD, you can copy a graph, pie chart from excel to it. Firstly select and copy an excel chart (Figure 1).
Figure 1

2. In the AutoCAD select Edit (Figure 2), then select Paste Special (Figure 3).
Figure 2

Figure 3

3. The Paste Special dialog box will appear (Figure 4), then select Picture (Enhanced Metafile), then click ok. After that, place or click the copied object where you want (Figure 5).
Figure 4

Figure 5

AutoCAD Shortcut Keys
AutoCAD 2007
Shortcut Keys
1. Like other software, AutoCAD can define shortcut keys which is to ease user and save time to search the menu from pull down menu or to an icon by selecting certain shortcut keys from keyboard. The bad things is user have to familiar and remember each of the shortcut keys Below is the shortcut keys that AutoCAD user usually use.
Shortcut Keys Description
F1 Display help menu
F2 Display text window on/off
F3 Osnap on/off
F8 Ortho on/off
F9 Snap on/off
CTRL+PAGE UP Change current layout to previous layout
CTRL+PAGE DOWN Change current layout to next layout
CTRL+A Select object in the drawing
CTRL+B Snap on/off
CTRL+C Copy object to clipboard
CTRL+F Osnap on/off
CTRL+L Ortho on/off
CTRL+N Creates new drawing
CTRL+O Opens existing drawing
CTRL+P Prints current drawing
CTRL+S Saves current drawing
CTRL+V Paste data from clipboard
CTRL+X Cut object to clipboard
CTRL+Y Repeat last action (REDO)
CTRL+Z Reverse last action (UNDO)
______________________________________________________________
Assigning Your Own Shortcut Keys
2. Users also can assign or define their own shortcut keys. Select View (Figure 1), go to Toolbars (Figure 2). Then the Customize User Interface window pop up (Figure 3). Go to the Keyboard Shortcuts.
Figure 1

Figure 2

Figure 3

3. Double click the Keyboard Shortcuts to select it. You can see there are many Keyboard Shortcuts (Figure 4). For example, click on New (Figure 4). At the red circle you can see the shortcut is CTRL+N. Click at shown arrow (Figure 5) and new shortcut keys will pop up and enter any keyboard shortcut keys you want and click ok (Figure 6).
Figure 4

Figure 5

Figure 6

How To Divide A Circle Into Equal Parts
1. Here is how you can divide your circle to get equally for each parts. Firstly draw a polygon for example with 12 corners (Figure 1).


Figure 1

2. Then draw a circle corresponded to the center of polygon (Figure 2)
Figure 2

3. Draw line from polygon edge to divide the circle equally (Figure 3).
Figure 3

4. Lastly, delete the polygon object and now you have your circle that equally divided into 12 parts (Figure 4).
Figure 4

Auto Hide Your Palette Properties
AutoCAD 2007
1. If you find a palette block your eye sight, you simply can minimize them instead of close the palette.
2. For an example, draw any object as shown in figure 1,
Figure 1

3. Click on the properties at the standard toolbar (Figure 2). Or Select object and right click and choose properties (Figure 3).
Figure 2

Figure 3

4. Properties window will shown as Figure 4.
Figure 4

5. Right click at the title bar (Figure 5) of palette, click to remove allow docking and select Auto-hide.Now you can see the palette is hiding when your cursor is outside the palette (Figure 6).
Figure 5

Figure 6

6. You can put palette properties at your side toolbar (Figure 6).
Figure 7

Customizing Your AutoCAD Options
AutoCAD 2007
1. Like other program, you can customize your AutoCAD options on your own such as Diplay (font, crosshair size, interface color, arc smoothness), open and save, drafting, 3D modelling and other.
Figure 1

Figure 2

2. After you choose the option, the option window dialog box will appear as shown in figure 3.
Figure 3

3. Click on the display tab, and choose font (Figure 4)
Figure 4
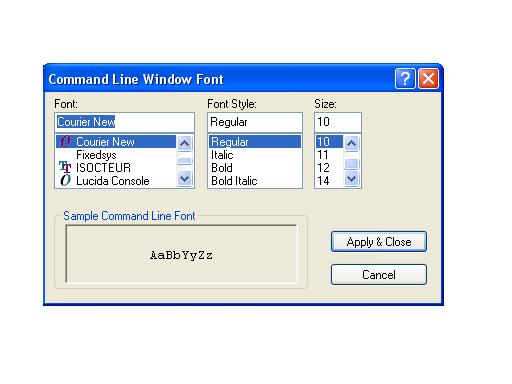
4. Here you can choose the type of Font, Font Style, and Size and example you can see at the Sample Command Line Font.
5. You can change the size of your Cross Hair (Figure 5)
Figure 5

6. At the Open and Save Tab (Figure 6), you can choose the saving format, length of automatic saving file or you can put password protection to your drawing.
Figure 6

7. At the Drafting Tab (Figure 7), you can chang the autosnap and autotrack setting.
Figure 7

8. You can explore this option setting and before close the option window, make sure to apply all of your setting and finally click ok, then you can see at the AutoCAD Interface the change that you made already.
Making Your Own Toolbar
AutoCAD 2007
Making Your Own Toolbar
This is important for certain AutoCAD user to make their own personal toolbar which is to ease them to select their usual and mainly used command in AutoCAD. The advantage is at the AutoCAD Interface we will have no crowded toolbar that we don't need.
Figure 1

Figure 2

1. First click the view from menu bar (Figure 1), then select the toolbar (Figure 2)
Figure 3

2. Then you will see the Customize User Interface window. There you can see the Customize and Transfer tab. Go to the Customize tab.
Figure 4

3. Right click on the Toolbar, choose New and click Toolbar (Figure 4)
Figure 5

4. After you select new toolbar, Toolbar1 will show up (Figure 5) and rename it for example My Toolbar (Figure 6)
(Figure 6)

5. Next you can choose all or some of the command that mainly you use for your design. At the bottom you can see the categories of command that you can choose from file, edit, view, dimension, modify and others (Figure 7).
Figure 7

6. In making your own toolbar for example, choose the draw categories (Figure 8).
Figure 8

7. Choose the command you prefer, click and drag it to My Toolbar (Figure 9).
Figure 9

8. In figure 10 you can see your line command is inside My Toolbar already. Drag other command that you want to use into My Toolbar. After that click Apply and Ok (Figure 10) to finish your toolbar making.
Figure 10

9. Now in your AutoCAD Interface you can see My Toolbar that you make just now (Figure 11).
Figure 11

Subscribe to:
Posts (Atom)